Posted on February 12, 2015 by Joel - Brushes, Foundation, Makeup, Tutorial
FOUNDATION APPLICATIONS
As much as we all wish our skin would cooperate 100% of the time, the disappointing fact is that it tends to behave exactly how we do not want it to at the worst possible times, before a big meeting or a first date, we always seem to have some sort of breakout right in the center of our foreheads.It is very tempting to call in sick and hide out with our best friends, Netflix and chocolate.Unfortunately that is not an option but lucky for us we have quite the arsenal of beauty products to remedy any situation.
Something that most people do not realize is that the level of coverage you want to achieve is not only based on the type of foundation you choose but also what tool you apply your foundation with.
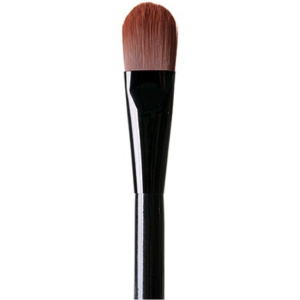 A tapered foundation brush like this one works best with liquid or cream foundation and is best for achieving full coverage.
1.Squeeze a small amount of foundation onto the back of your hand and dip the brush into it.
2. You can then apply the foundation on your face and neck starting in the center of your face and working outward in downward strokes.
3. You may need to pat and blend to make sure there are no creases or lines.
A tapered foundation brush like this one works best with liquid or cream foundation and is best for achieving full coverage.
1.Squeeze a small amount of foundation onto the back of your hand and dip the brush into it.
2. You can then apply the foundation on your face and neck starting in the center of your face and working outward in downward strokes.
3. You may need to pat and blend to make sure there are no creases or lines.
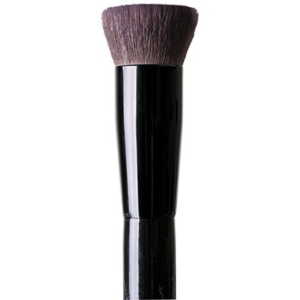 A flat top foundation brush, like our Contour Brush , works best with liquid or cream foundation to get a medium coverage.
1.Again squeeze the foundation onto the back of your hand and swirl the brush in the product.
2.Using that same circular motion buff your foundation all over your face and neck. You can also alternate stroking motions to apply foundation in precise areas. This brush creates a more natural look because the product is not just sitting on top of your skin.
A flat top foundation brush, like our Contour Brush , works best with liquid or cream foundation to get a medium coverage.
1.Again squeeze the foundation onto the back of your hand and swirl the brush in the product.
2.Using that same circular motion buff your foundation all over your face and neck. You can also alternate stroking motions to apply foundation in precise areas. This brush creates a more natural look because the product is not just sitting on top of your skin.
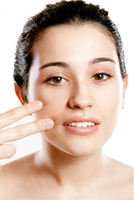 Using your fingers to apply your foundation works best with light coverage liquids, like our Brightening CC Cream andMineral Photo Touch Foundation . To apply foundation with your fingers:
1.You want to start by washing your hands as to not transfer any acne causing bacteria to your face.
2.Then squeeze the product on to your wrist or the back of your hand and use your fingers to warm it up.
3.Then apply your foundation in circular motions massaging the product into your skin.
Using your fingers to apply your foundation works best with light coverage liquids, like our Brightening CC Cream andMineral Photo Touch Foundation . To apply foundation with your fingers:
1.You want to start by washing your hands as to not transfer any acne causing bacteria to your face.
2.Then squeeze the product on to your wrist or the back of your hand and use your fingers to warm it up.
3.Then apply your foundation in circular motions massaging the product into your skin.
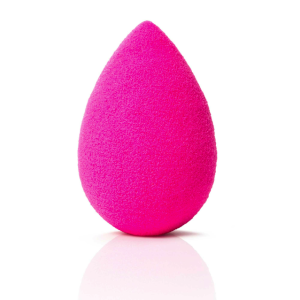 If you want to achieve a natural finish but also work with a tool that allows you to build coverage using liquid foundation the beauty sponge is a great option.
1. First you will need to wet your sponge by holding it under water and squeezing it till it expands. (You then need to thoroughly squeeze our any excess water, sometimes it is useful to wrap the sponge in a towel and squeeze.)
2. Squeeze your foundation onto the back of your hand and dip the sponge into the product.
3. Gently press the foundation into your skin and use sweeping motions to evenly apply your foundation.
If you want to achieve a natural finish but also work with a tool that allows you to build coverage using liquid foundation the beauty sponge is a great option.
1. First you will need to wet your sponge by holding it under water and squeezing it till it expands. (You then need to thoroughly squeeze our any excess water, sometimes it is useful to wrap the sponge in a towel and squeeze.)
2. Squeeze your foundation onto the back of your hand and dip the sponge into the product.
3. Gently press the foundation into your skin and use sweeping motions to evenly apply your foundation.
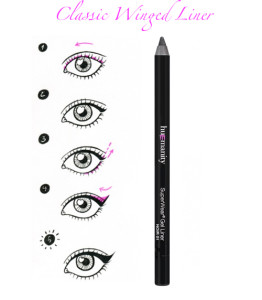 I absolutely LOVE using winged eyeliner to dress up my look. Something about it just looks so classic to me and I think it really accentuates my eyes.
For this tutorial we are keeping it simple, the trick is to start small and slowly build it up so you don't end up with eye liner all over the place.
1) Start by tight lining your eye, get as close to the lashes as you can and just leave little marks. Moving from the outer corner to inner corner of your eye.
2) Now is where you go back and fill in to give yourself that consistent, smooth line. It should look like a basic line you might wear everyday.
3) Here is where the fun begins. Using the pencil and tip of your nose as a guide slowly draw a thin light line from the outer corner of your eye. Match this angle on the other side and then thicken the lines once you have the angle you want.
4) Now you simply fill in the corner of your lid, creating a smooth rounded top line.
5) Voila! You have perfect winged liner. Use a cotton swap and makeup remover to carefully erase any smudges you might have.
** If you have a hard time getting clean lines using a slanted liner brush will give you more control!
I absolutely LOVE using winged eyeliner to dress up my look. Something about it just looks so classic to me and I think it really accentuates my eyes.
For this tutorial we are keeping it simple, the trick is to start small and slowly build it up so you don't end up with eye liner all over the place.
1) Start by tight lining your eye, get as close to the lashes as you can and just leave little marks. Moving from the outer corner to inner corner of your eye.
2) Now is where you go back and fill in to give yourself that consistent, smooth line. It should look like a basic line you might wear everyday.
3) Here is where the fun begins. Using the pencil and tip of your nose as a guide slowly draw a thin light line from the outer corner of your eye. Match this angle on the other side and then thicken the lines once you have the angle you want.
4) Now you simply fill in the corner of your lid, creating a smooth rounded top line.
5) Voila! You have perfect winged liner. Use a cotton swap and makeup remover to carefully erase any smudges you might have.
** If you have a hard time getting clean lines using a slanted liner brush will give you more control!